Wednesday, June 8, 2011

Easy Pound Cake


I remember clearly the day I baked my first cake. It was my Dad’s favorite kind, Pound Cake. Before I share the recipe with you I will tell you a little about the history of Pound Cake. Pound Cake was invented in the early 18th century. It was called Pound Cake because the ingredients consisted only of a pound of: sugar, flour, butter, and eggs. Later people started adding a liquid such as milk and a rising agent such as baking powder.

Easy Pound Cake

3 sticks margarine/butter
2 ¾ cups sugar
5 eggs
2 tsp. vanilla extract
3 cups flour
½ tsp. baking powder
1 cup milk

Mix the dry ingredients together in a separate bowl and set aside. In a mixer cream butter and sugar together. When I was new at cooking, I was confused by the term "cream". It simply means to blend something together until it is a creamy or fluffy consistency. Then add eggs one at a time. Add vanilla extract. Then alternate between adding the dry ingredients and the milk. Bake at 325 degrees for 60-70 minutes or until a toothpick inserted comes out clean. Let cool, then enjoy!

The history of pound cake: http://www.poundcake.net/

~Grace

I am a seventeen year old homeschool graduate with a love for: God, family, writing, photography, cooking, and old movies. When I was fourteen I was sure I wanted to go to college and learn Home Economics. I wanted to learn to cook, really well. But by the time I actually applied for college last year, my career interests had changed. I want to firstly follow God, so I decided to major in Philosophy and Religion and probably minor in English. I knew that with learning about God, I would not be disappointed. And writing has always been something I enjoy. But although my career plan has changed, my love of cooking still remains. I think healthy eating is very important. On the other hand I am not a health freak, I like eating my sugary deep fried substance now and then. But I think moderation is really important, after all self-control is a fruit of the spirit.

If you have any comments or questions, you can email Grace @ girlofsoutherngrace@yahoo.com 

Tuesday, May 31, 2011

Guiltless Peanut Butter Cookies

People say you should always give a good first impression. Put your best foot forward. Or in my case serve your best dish first. You might be thinking, “Guiltless Peanut Butter Cookies? Is that the best you can do?” The answer to that is no, I can do much better. But you must excuse me, for I am staying in a hotel room and almost all my recipes are at home. So I guess I will save the best for last and you will have to take comfort in the phrase, “Good things come to those who wait.”

Now I don’t want you to get the wrong idea, “Guiltless Peanut Butter Cookies” are not all bad. In fact, they are quite tasty. Besides that, they are as the title infers guiltless. They are also really easy to make, and perfect for road trip snacks.

Ingredients:

1 cup creamy peanut butter

1 1/3 cup diet sweetener (or 1 cup sugar)

1 egg

1/2 teaspoon vanilla extract

Optional: I like to throw in a handful of chocolate chips. They add sugar, but the taste is so worth it.

Preheat the oven to 350 degrees F (180 degrees C). Mix all the ingredients together. Roll the dough into teaspoon sized balls and put on a cookie sheet. Bake for 10 minutes. Let cool, then enjoy! This serves six people with very small appetites so you might want to double the recipe.

The original recipe can be found here: http://allrecipes.com/Recipe/Flourless-Peanut-Butter-Cookies/Detail.aspx


~Grace

I am a seventeen year old homeschool graduate with a love for: God, family, writing, photography, cooking, and old movies. When I was fourteen I was sure I wanted to go to college and learn Home Economics. I wanted to learn to cook, really well. But by the time I actually applied for college last year, my career interests had changed. I want to firstly follow God, so I decided to major in Philosophy and Religion and probably minor in English. I knew that with learning about God, I would not be disappointed. And writing has always been something I enjoy. But although my career plan has changed, my love of cooking still remains. I think healthy eating is very important. On the other hand I am not a health freak, I like eating my sugary deep fried substance now and then. But I think moderation is really important, after all self-control is a fruit of the spirit.

If you have any comments or questions, you can email Grace @ girlofsoutherngrace@yahoo.com 

Monday, May 30, 2011

Homemade "Maple" Syrup

Ever had one of those days when you cook a great batch of pancakes, only to find that you're out of maple syrup? Instead of running to the store, why not make your own syrup? Although this brown sugar substitute isn't as tasty as true maple syrup, it packs plenty of punch.

Having lived with a large family, I'm used to making a lot of food. If you're just making this for yourself and/or a friend or two, you might want to cut the recipe in half, or even quarters.

1 Cup of brown sugar
2 Cups of water (preferably warm, but it can be cold.)

mix brown sugar and water in a saucepan, bring to a boil and boil for 30 seconds (to make sure it doesn't burn, use a double boiler if you can't watch it constantly). Let cool for about 5 minutes before pouring over pancakes or waffles.


Enjoy!
~Gideon Reynolds

Gideon Reynolds, 18, is a homeschool graduate, dedicated to getting men in the kitchen. He has lived most of his life on a 160 acre farm deep in the Ozark Mountains. Currently he is taking online college courses, and shepherding of a herd of 30+/- sheep. Introduced to cooking at a young age, he's always enjoyed working in the kitchen.

Sunday, May 29, 2011

Strawberry Milkshake to Die For

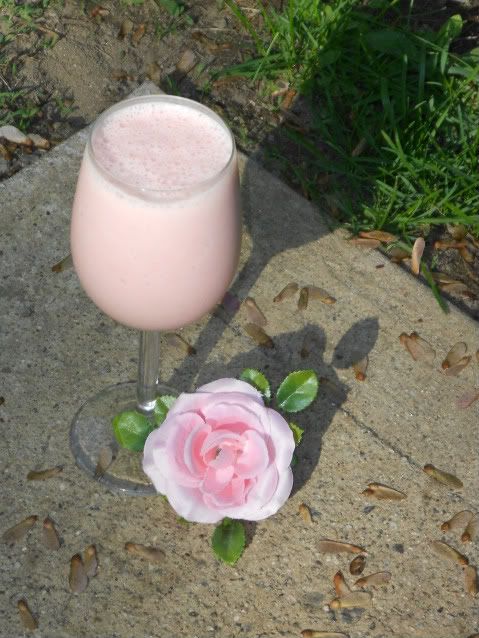
I don’t know about you, but as it gets to be summer I start searching around for anything that’s cool and refreshing - Popsicles, Ice Cream, Watermelon, and of course Milkshakes! Smile However, you can only eat SO much ice cream, especially since it’s not as healthy for ya as most of us would wish! Wink Anyways, one day on a hot summer day I was flipping through “Healthy Choices”, and I came across a recipe for a Strawberry Milkshake and thought, “Hey Why not??” And so proceeded to make it. One sip of the beautiful pink cupful, and I was totally hooked! Smile A lovely blend of strawberries, lemon, and sweetness! I love when stuff has lemon in it and yet is sweet - makes for an amazing balance of sweet and tart. I hope that you will enjoy it as much as I do!!

A few notes about this recipe - the cookbook says that it will serve two, but I have found that it serves 4 comfortably - unless you want to drink a TON of it. Wink Also the shake in the picture has more milk in it because I didn’t have as many strawberries as I needed, but couldn’t tell because they were in a frozen lump! Wink Normally it turns out much pinker and thicker, which I love, but if you like things a little thinner just don’t add quite as many strawberries - it’s really good that way too!! If you like things much more tart than most people do, or are just someone who automatically just wants to cut the sugar in half (like my Mom and Grandma! Wink), experiment around with it until you get the taste you are looking for. The sweetness of the final product really depends a lot on how sweet the strawberries which you are using happen to be. Such as in the past I have made this shake and it’s been super sweet, and then today I made it and it was a bit more tart. Smile
For getting frozen strawberries, if you like to put up your own, the way we do ours is after we pick the strawberries, we wash them, chop the tops off, and then lay them out on cookie sheets in the freezer until they are frozen before bagging them, and having frozen strawberries all year round! Smile

Ok, without further ado I will give you the recipe! Smile

2 cups Milk
25 whole, large, frozen Strawberries
⅓ cup Maple Syrup
3 Tbsp. Fresh Lemon Juice

Pour milk into blender. Put in strawberries, maple syrup, and lemon juice. Blend on high until smooth. Serve in glass tumblers with straws - Yummy! Can be used to make Popsicles.
(From the “Healthy Choices” cookbook, from the kitchens of the “Keeper at Home” magazine’s readers.).

Hope you enjoy!!Smile 

~Amy Irene


Amy Irene is a homeschool graduate, currently attending community college with a major in Deaf Studies. She’s 20 but feels about 17-years-old, and is still figuring life out. She loves the Lord with everything in her, and is an expert at burning water in the kitchen so if she can make it, you can too!

Friday, May 27, 2011

For my first instructional post, I'll list some of the more mathematical properties of cooking.

A general measurement of liquids or solids is the Cup measurement.
Another common measurement is the teaspoon.

for those of you who only drink 1/2 liter bottles of soda:
2 cups is a little less than 1/2 liter, that converts to 96 teaspoons.

Ok, now to list them properly;

3 teaspoons = 1 tablespoon 
48 teaspoons = 1 cup 
16 tablespoons = 1 cup
12 tablespoons = 3/4 cup
10 tablespoons + 2 teaspoons = 2/3 cup
8 tablespoons = 1/2 cup
6 tablespoons = 3/8 cup
5 tablespoons + 1 teaspoon = 1/3 cup
4 tablespoons = 1/4 cup
2 tablespoons = 1/8 cup
2 tablespoons + 2 teaspoons = 1/6 cup
1 tablespoon = 1/16 cup
2 cups = 1 pint
2 pints = 1 quart 
4 quarts = 1 gallon
 
 Have fun with your cooking!
~Gideon

Thursday, May 26, 2011

Welcome to Cooking 101

This blog is designed for homeschoolers, but everyone is welcome to browse through.
If you have an instructional article or movie you want to post, just PM  me on my HSA account, or Email me @ gideon.m.reynolds@gmail.com